DW Page: Configure Homepage Layout
Important Note 1:
This guide is used to guide step-by-step how to configure out the homepage to look like our demo site.
Important Note 2:
From version 1.1.0, DW Page supported the page builder to build the landing homepage flexibly according to your taste. However, we strongly recommend that you should build your own site as instructed in our guide. Other page builder styles can make your site broken layout.
Important Note 3:
The homepage is built by using the following plugins: Page Builder by Site Origin, SiteOrigin Widgets Bundle, Projects by Woothemes, Our Team by Woothemes, Testimonial by Woothemes and Contact Form 7. Therefore, please install and activate them before configuring out the homepage layout like our demo.
Here is the screenshot of the sections of the DW Page theme.
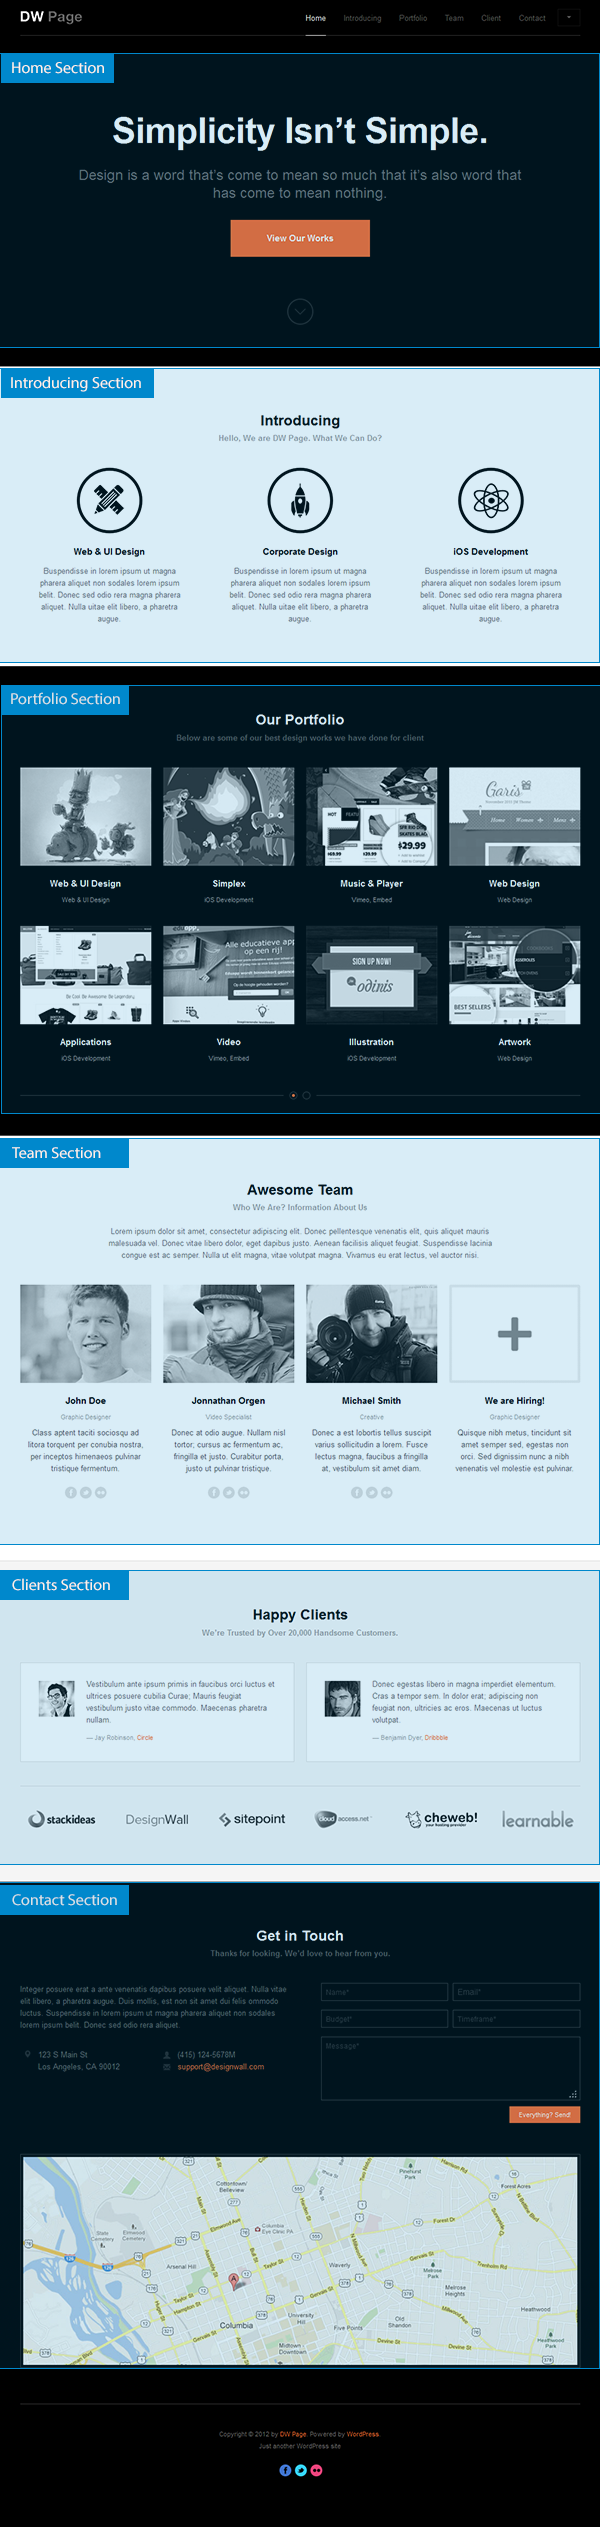
The DW Page theme contains the following sections: Home section, Introducing section, Portfolio section, Team section, Client section, blog and Contact section. All sections will be put inside of one page which is assigned into your Main Homepage.
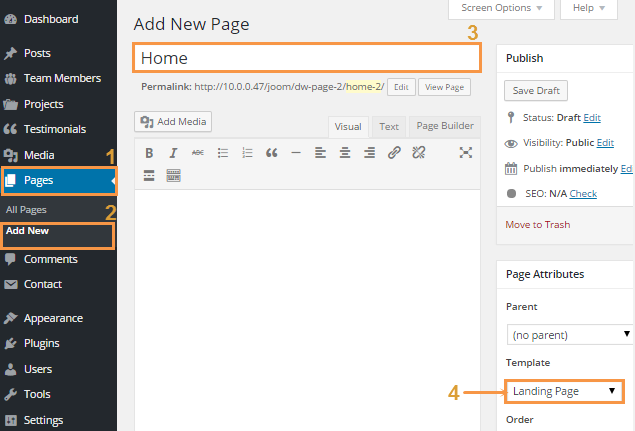
Step 1 Create the Homepage
Navigate to backend >> Pages >> Add New. After entering the title of the page, choosing the page parent, make sure that you select page template as Landing Page
Step 2 Using page builder to build your own homepage.
Once the Page Builder by SiteOrigin plugin activated, an extra tab will be added automatically to the standard WordPress editor as shown below:
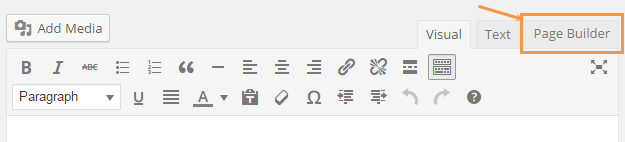
Just switch into Page Builder tab and begin using it. For further info, the plugin documentation can be found here.
Home Section
Important Note: To build a complete home section, you need to install the Page Builder by SiteOrigin and SiteOrigin Widgets Bundle first.
As the Demo site, please follow our instruction below:
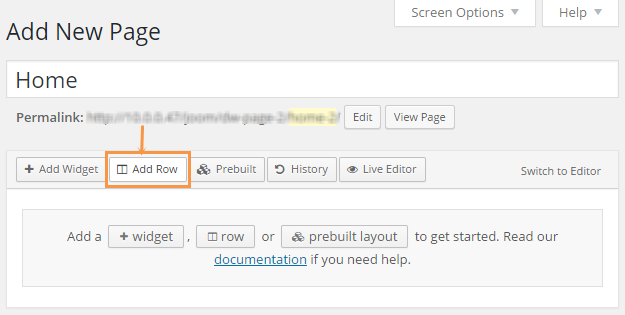
Step 1 Navigate to Pages >> Home >> Page Builder
Step 2 Add a new row to the page.
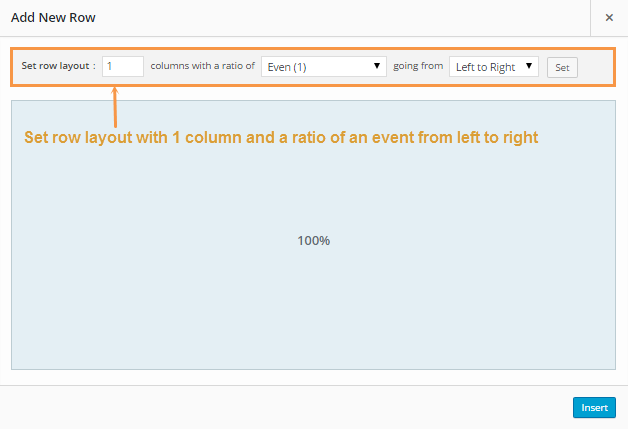
Step 3 Set the row layout
After clicking on “Add Row” button, an “Add New Row” dialog will be displayed. Selecting the number of cells in the row is 1 cell-layout with an even ratio from left to right. Press “Insert” button to finish.
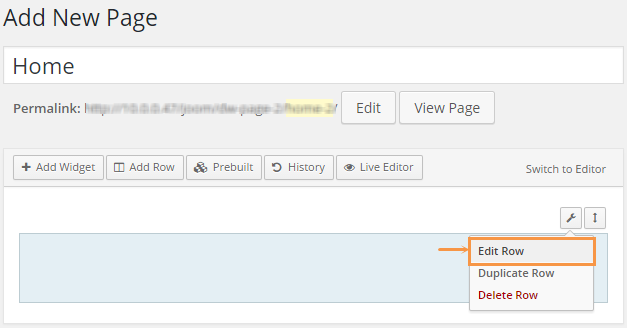
Step 4 Insert Row Class
Click on the spanner icon in the top right corner above that row to start editing.
The “Edit Row” dialog will appear, find the Row Styles Sidebar >> Attributes >>Row Class. Copy & page the following class into “Row Class”.
section section-hero text-center
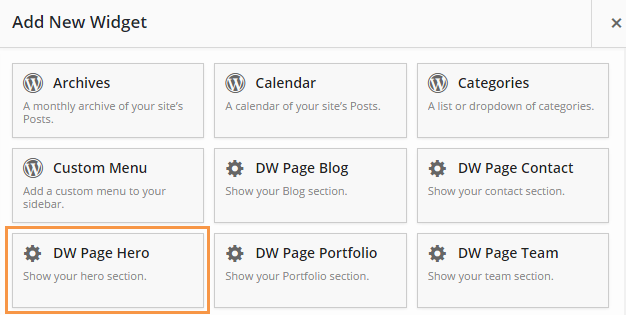
Step 5 Insert DW Page Hero widget to the row
To add a widget, first activate the row to which you wish to add the widget. Then click on “+ Add Widget.”
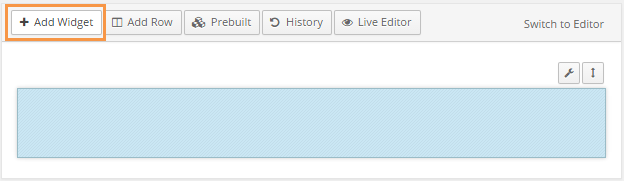
Look for the DW Page Hero widget and add it to the row
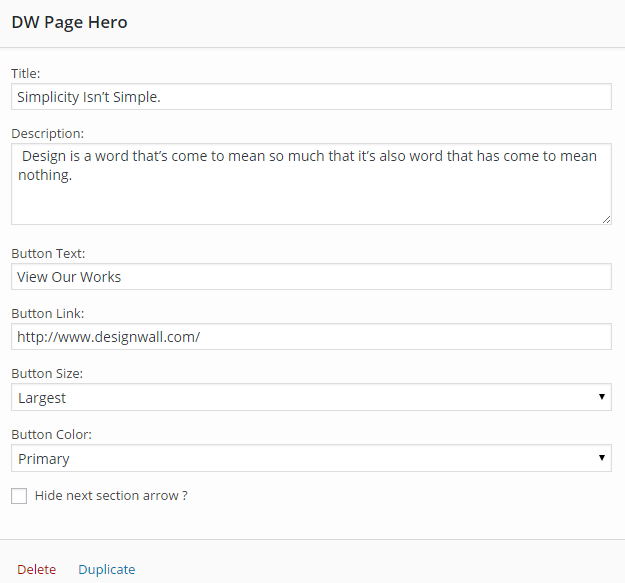
Once done, start configuring out according to your taste
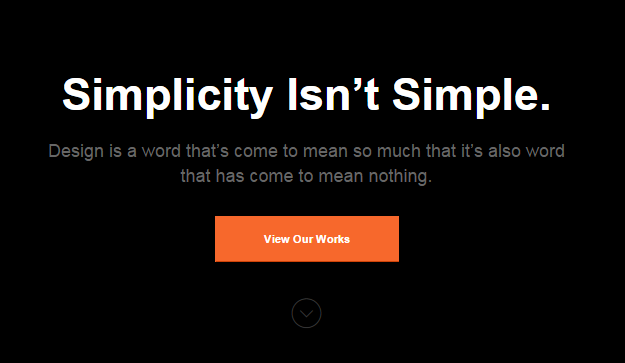
The screenshot below is the front-end of the home section:
Introducing Section
This section contains a row with 2 widgets: DW Page Header and SiteOrigin Features. Follow the instruction below.
Step1 Navigate to Dashboard >> Pages >> Home
Step 2 Add a new row under the row contained the DW Page Hero
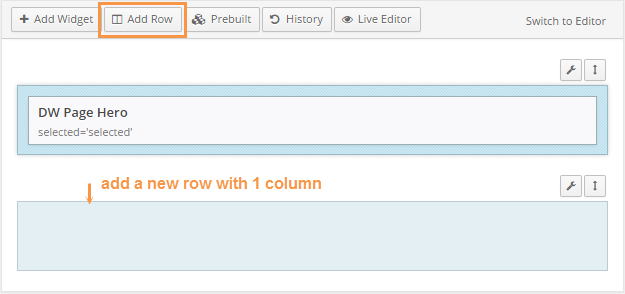
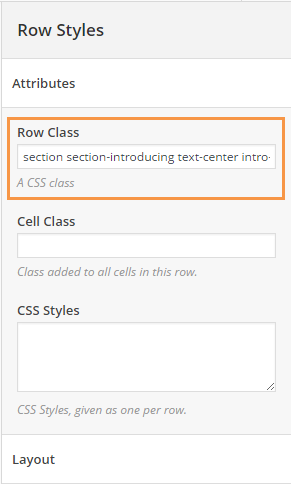
Step 3 Add row class
In the row, click on ” Edit row”. The “Edit Row” dialog shows, find the Row Styles Sidebar >> Attributes >>Row Class. Copy & page the following class into “Row Class”.
section section-introducing text-center intro-wrap
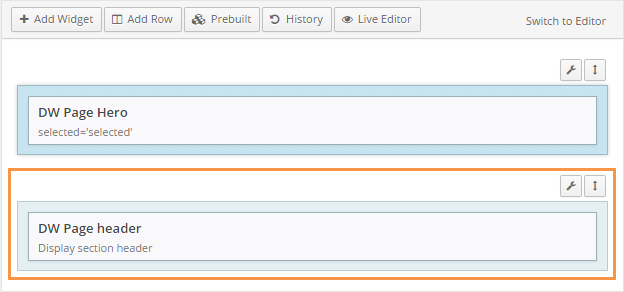
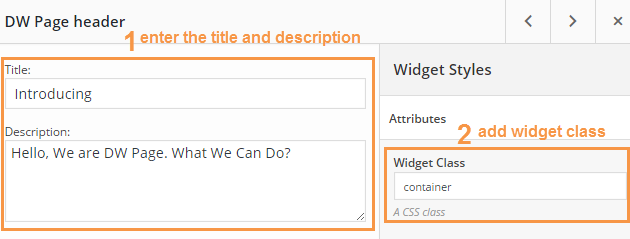
Step 4 Add DW Page Header widget to the row
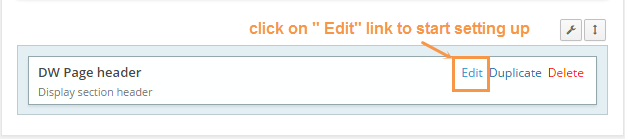
Step 5 Config the DW Page Header widget and add row class
Click on ” Edit” link of DW Page Header widget to start setting up.
Input the title, content as you wish. Make sure that you copy & paste the row class below into Widget Styles >> Attributes >> Widget Class
container
Step 6 Add SiteOrrigin Features widget to the same row with the DW Page Header widget.
Click on ” Add Widget” button, then find the SiteOrigin Features widget to add.
Step 7 Add features, select container shape & size, icon size, features per row and other options.
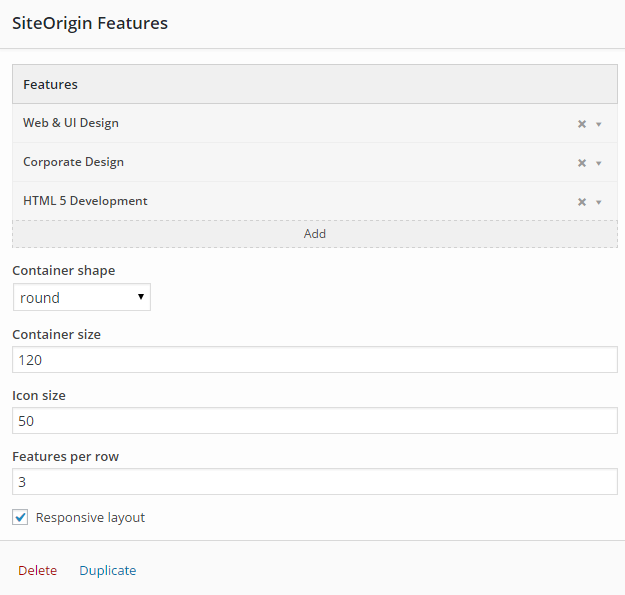
You can find the features widget documentation here.
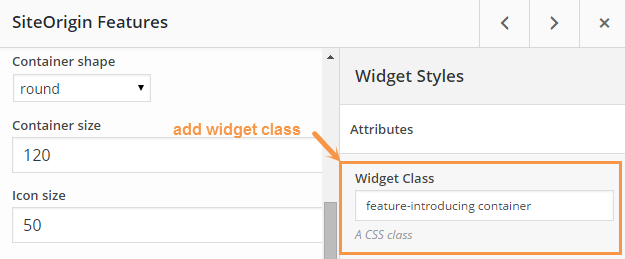
Once you finish, look at the Widget Styles sidebar on the right side, go to Attributes >> Widget Class, add the class below:
feature-introducing container
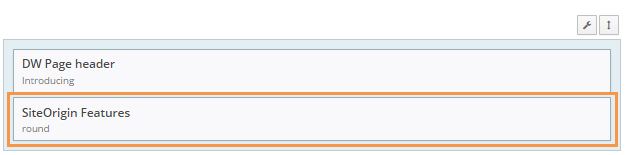
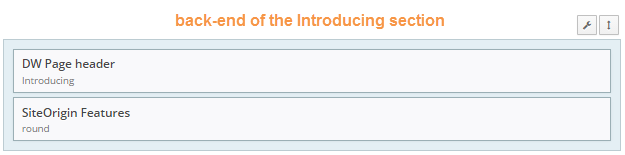
Lets take a look at the backend of the Introducing section with two widgets: DW Page Header and SiteOrigin Features.
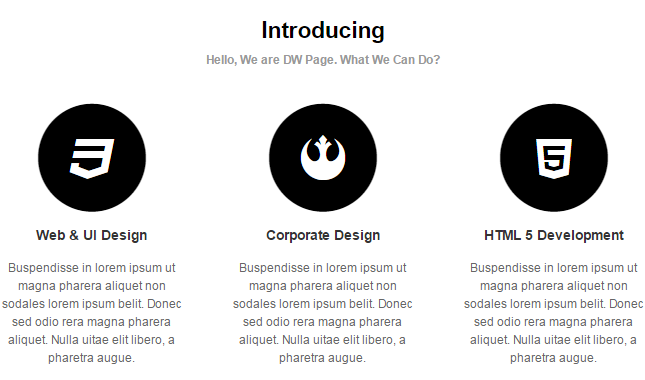
Front-end Appearance:
Portfolio Section
Important Note: To build this section properly, you need to install & activate the plugin called Projects by Woo Themes first.
Prase 1: Create Projects
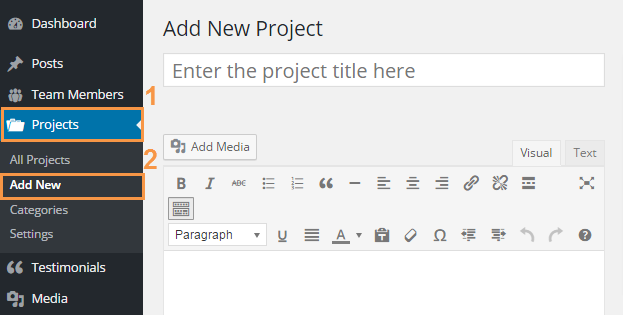
Step 1 Add projects
After activating the Projects by Woo Themes plugin, you will see a tab titled Projects in the Dashboard bar. Hover over Projects >> Add New. Input the project title, insert your post content in the editor area.
Step 2 Add Categories, tags for the project on the right side.
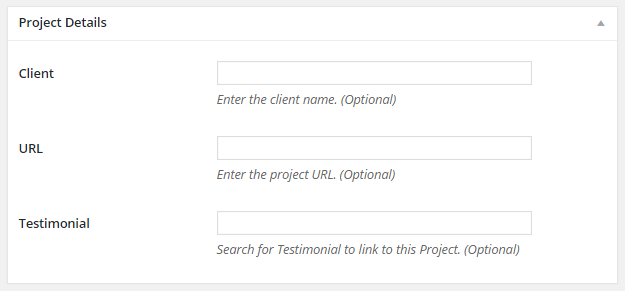
Step 3 Add project details such as client, URL or testimonial from the Project Details box under the editor area.
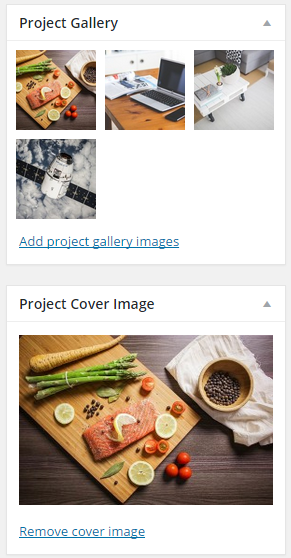
Step 4 For project gallery, click on “Add Project Gallery Image” link from the right sidebar , each image will be a slide in the slideshow.
Step 5 For project cover image, click on “Set Cover Image“.IMPORTANT: you must upload a cover image to each project to load on portfolio section.
Prase 2: Add projects to Homepage
Step 1 Navigate to Pages >> Home >> Page Builder
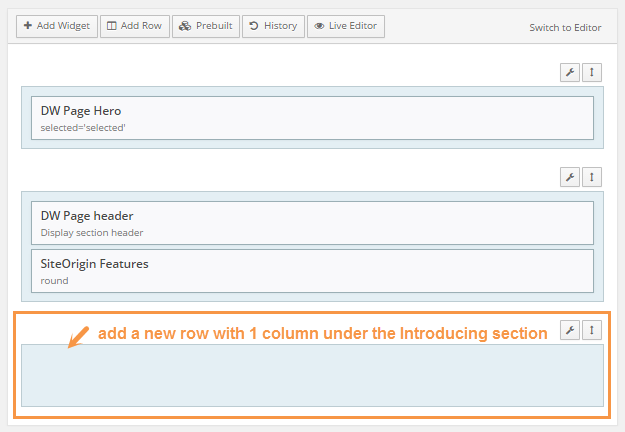
Step 2 Add a new row under the Introducing section as follows
Step 3 Add row class
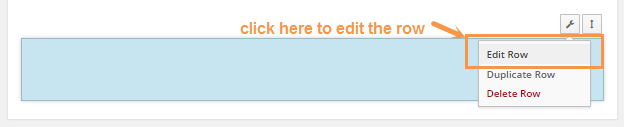
Click on ” Edit Row” to start editing
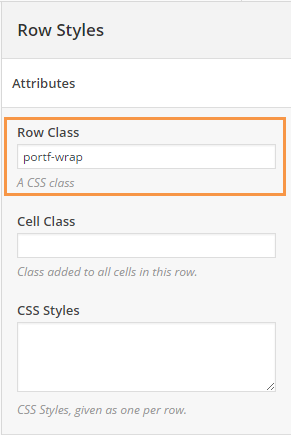
An “Edit Row” dialog will appear, find Row Styles >> Attributes >> Row Class from the right side, then copy & paste the following class to the Row Class
portf-wrap
Step 4 Add DW Page Portfolio widget
Click on ” Add Widget” button, then find and add the DW Page Portfolio widget.

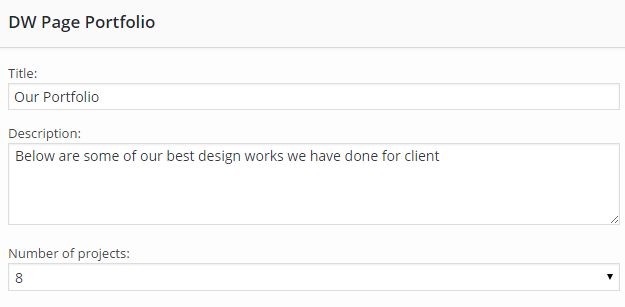
Step 5 Input the title, description and choose number of projects you want to show
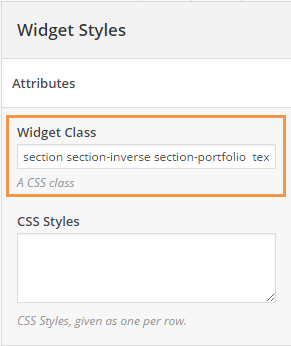
Step 6 Add Widget Class for the DW Page Portfolio widget
Inside the DW Page Portfolio widget, navigate to Widget Styles >> Attributes >> Widget Class, copy & paste the class below:
section section-inverse section-portfolio text-center
Once done, hit ” Save ” button to save all settings.
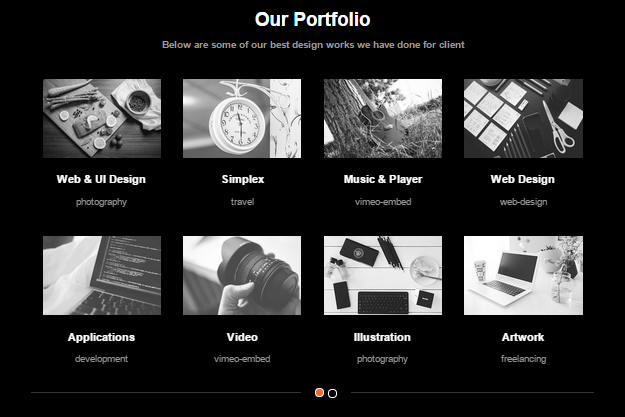
Front-end appearance
Team Section
Important Note: This section requires Our Team by Woo Themes plugin. Please make sure that you installed and activated it.
Prase 1: Add New team
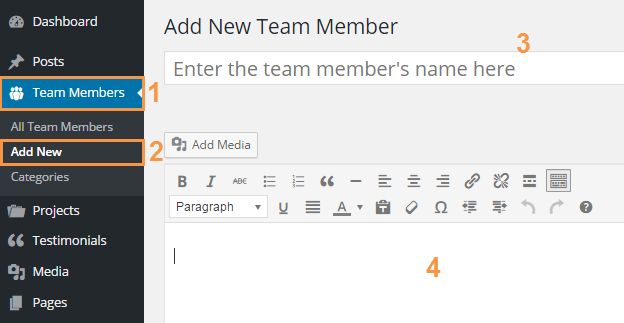
Step 1 After activating the Our Team by Woo Themes plugin, a tab titled Team Members will appear on Dashboard menu, just navigate Team Members >> Add New to enter the title for the team, input the content as follows:
Step 2 Assign Categories, Tags for the team if needed from the right sidebar.
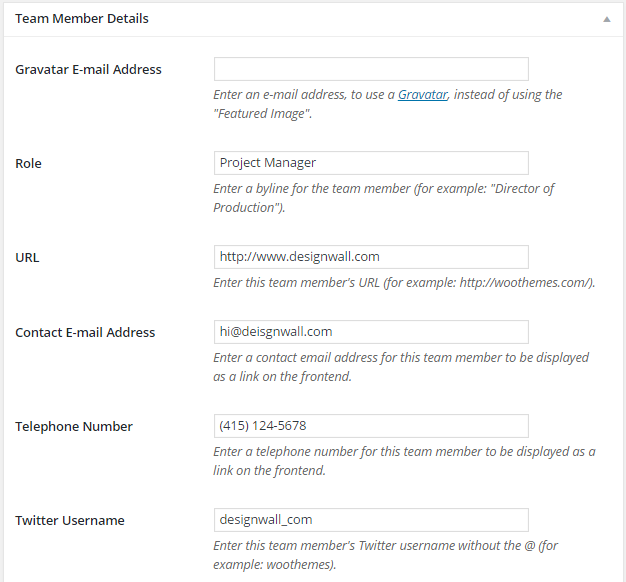
Step 3 Add Team Member details under the editor area.
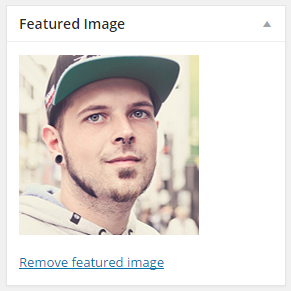
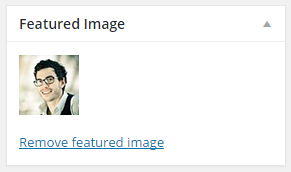
Step 4 For member featured image, click on “Set featured Image“.
IMPORTANT: you must upload a featured image to each member to load on member section.
Phrase 2: Add team members to the Homepage
Step 1 Navigate to Pages >> Home >> Page builder
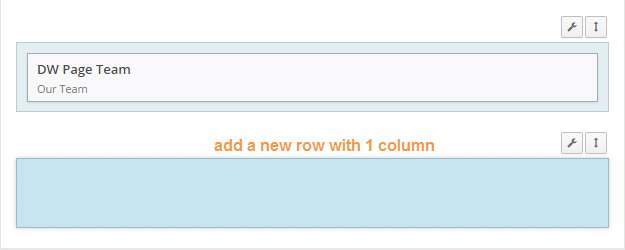
Step 2 Add a new row under the Portfolio section as follows
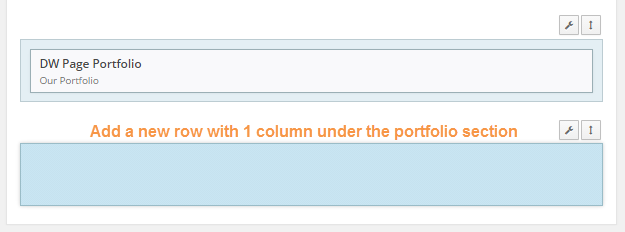
Step 3 Add DW Page Team widget to the row

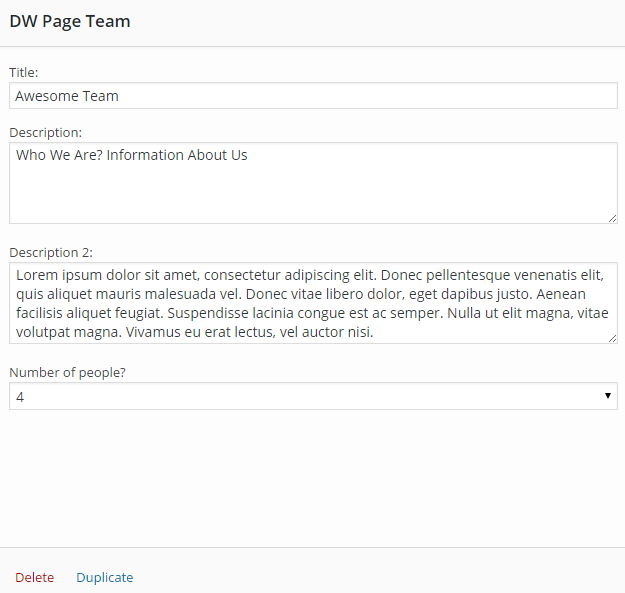
Step 4 Input the title, description and choose number of members to show at front-end
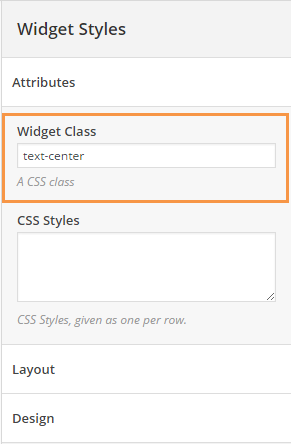
Step 5 Go to the DW Page Team widget >> Widget Styles >> Attributes >> Widget Class, copy & paste the following class
text-center
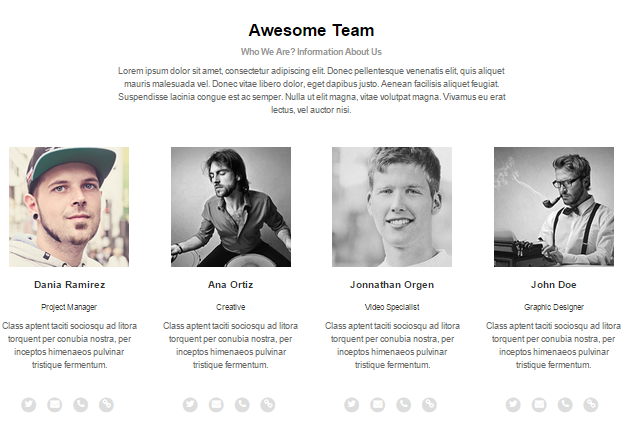
Front-end appearance
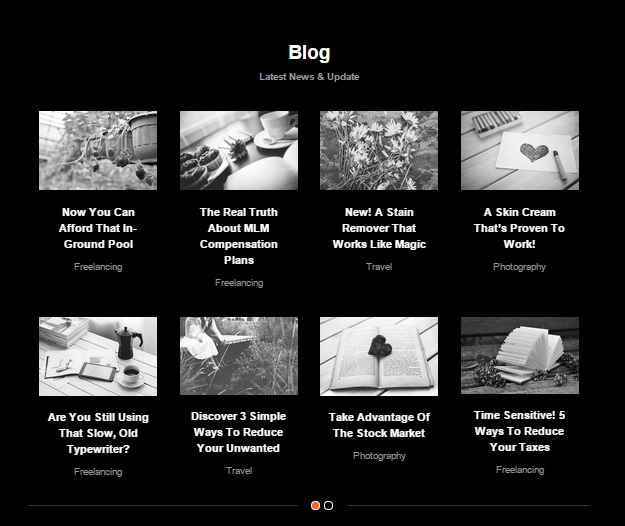
Blog Section
This section will let you to present your blog posts along with the portfolio style. Below is step by step instruction.
Phrase 1: Create blog posts
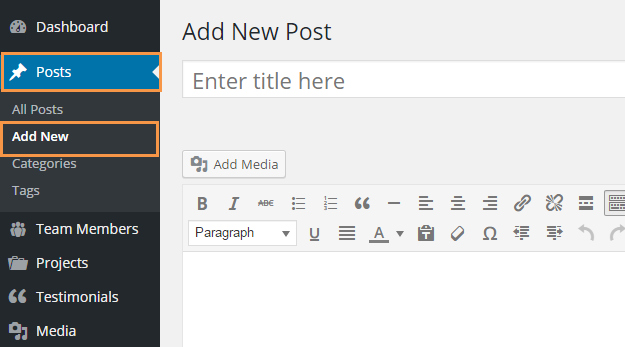
Step 1 Navigate to Dashboard >> Posts >> Add New
Step 2 Create a title, and insert your post content in the editing field.
Step 3 Add Categories, Tags from the right side.
Step 4 For a single image, click on ” Set featured image” link to start set the featured image.
IMPORTANT NOTE: You must upload the featured image for each blog post to show at front-end
Phrase 2: Add blog posts to the homepage
Step 1 Go to Pages >> Home, click on Page builder tab
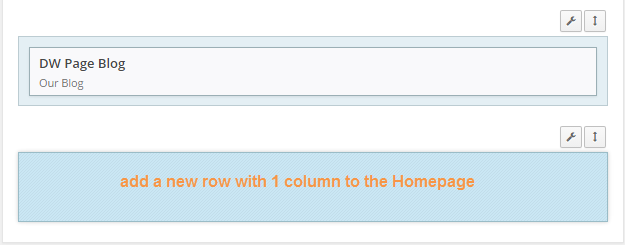
Step 2 Add a new row to the Homepage
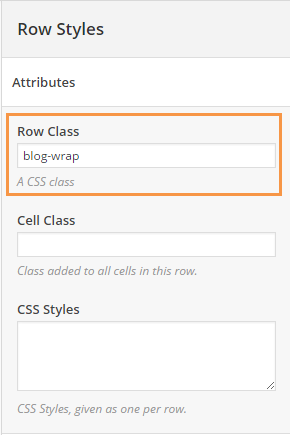
Step 3 Edit the row and add class row
Click on ” Edit Row” to start editing

Then find Row Styles >> Attributes >> Row Class, add the class below
blog-wrap
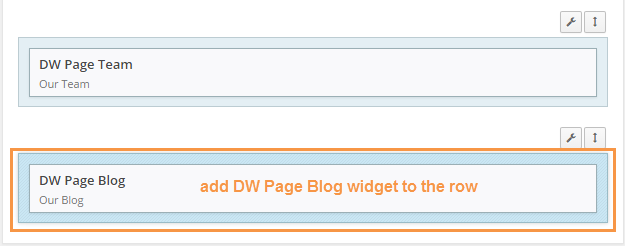
Step 4 Add DW Page Blog widget to the row
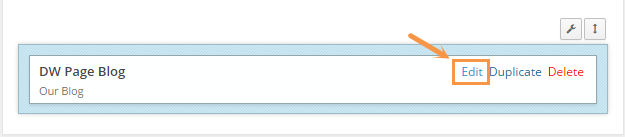
Step 5 Hover over the DW Page Blog widget to edit the widget.
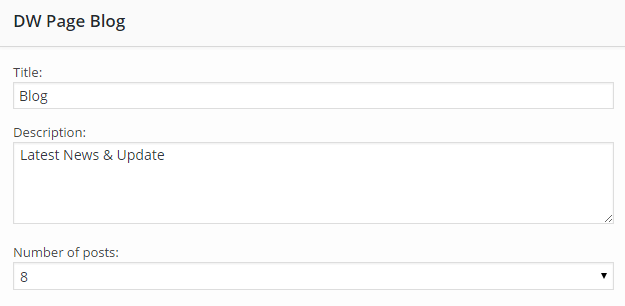
Step 6 Enter a title, insert the content for the widget and choose number of blog posts show at front-end
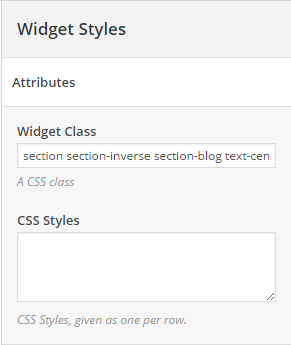
Step 7 Add widget class
Navigate to DW Page Blog widget >> Widget Styles >> Attributes >> Widget Class from the right sidebar, insert the class below:
section section-inverse section-blog text-center
Frontend Appearance
Cients Section
Important Note: This section needs a plugin called Testimonials by WooThemes. You must install and activate it before you start building the section.
Phrase 1: Create new testimonials
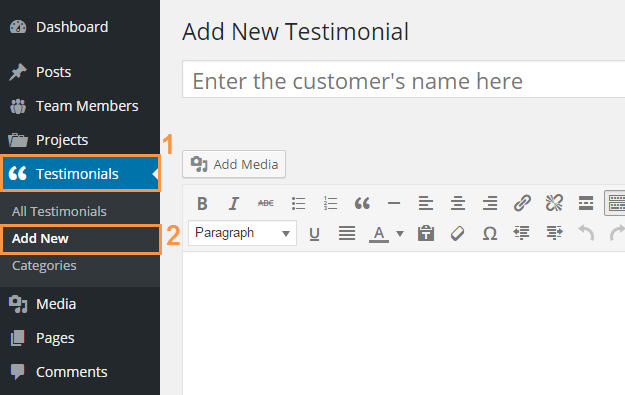
Step 1. Add new testimonial
Once you activated the Testimonials by WooThemes plugin, an item “Testimonial” will automatically added to your WordPress admin sidebar. Just navigate to Testimonials >> Add New
Step 2 Input the customer’s name, the quote in the editing fields.
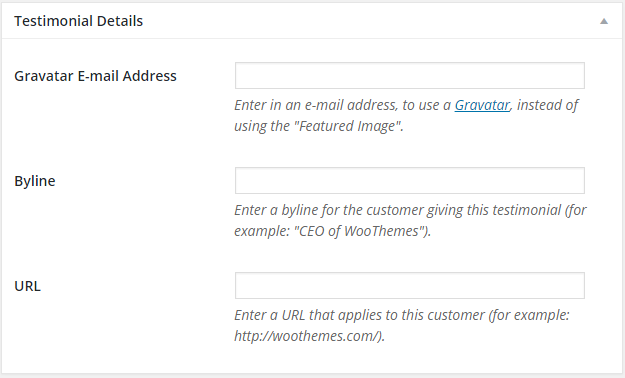
Step 3 Enter the testimonials details
Step 4 Set featured image for each testimonial by clicking on the link ” Set featured image”.
IMPORTANT: You need to set featured image for each testimonial to present on the testimonials section.
Phrase 2: Add your testimonials to the homepage
Step 1 Redirect to Pages >> Home, click on the Page Builder tab
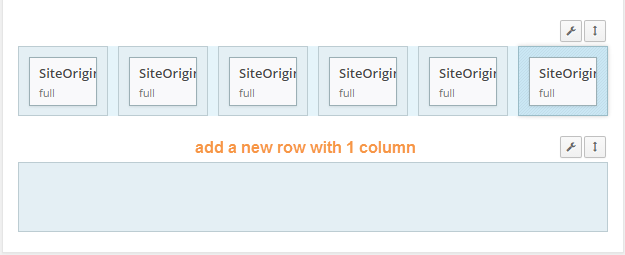
Step 2 Add a new row with 1 column to the Homepage
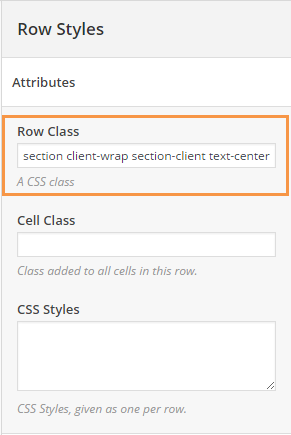
Step 3 Edit and add row class

After clickin on “Edit Row”, an ” Edit Row” dialog will appear. Now, look at the right side, go to Row Styles >> Attributes >> Row Class, copy & paste the class below:
section client-wrap section-client text-center padding-bottom-xs-0
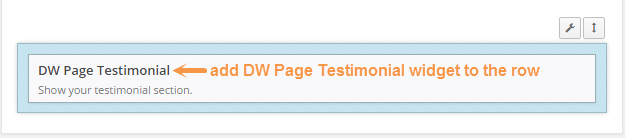
Step 4 Add DW Page Testimonials widget to the row
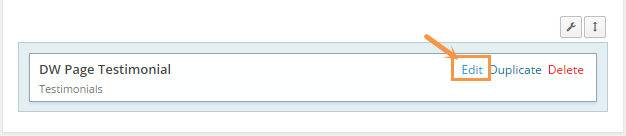
Step 5
Hover over the DW Page Testimonials widget you have just added, you will see functions as edit, delete…. Click on “Edit”
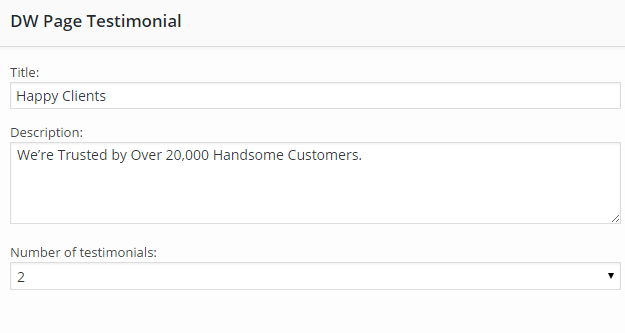
Input a title, description and select number of testimonials you wish show.
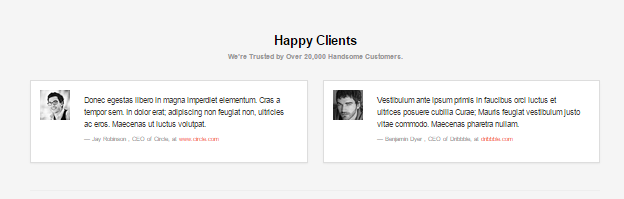
Front-end Appearance
Phrase 3: Add your client’s logos to the homepage
Step 1 Go to Pages >> Home, click on the Page Builder tab
Step 2 Add a new row with 6 columns ( you can select number of columns as you wish) under the Happy Clients section

Step 3 Click on ” Edit row”

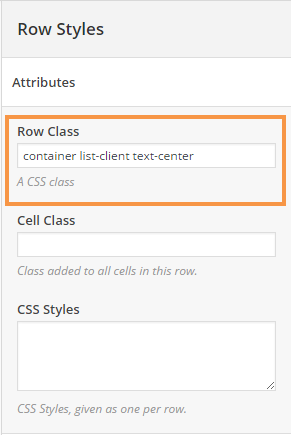
Step 4 After clicking on “Edit Row” , an edit row dialog will be presented, find Row Styles >> Attributes >> Row Class and copy & paste the following class
container list-client text-center

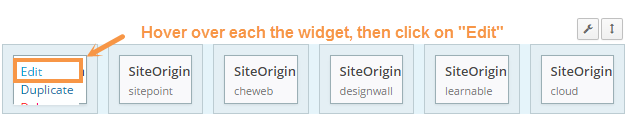
Step 5 Add SiteOrigin Image widget to each column of the row
Activate each column, then click on ” Add Widget” button, find the widget titled SiteOrigin Image to add as follows:

Step 6 Edit each the SiteOrigin Image widget, then add widget class to each the widget
Once clicked on “Edit” link, an edit widget dialog will be show, go to Widget Styles >> Attributes >> Widget Class, insert the class below:
client
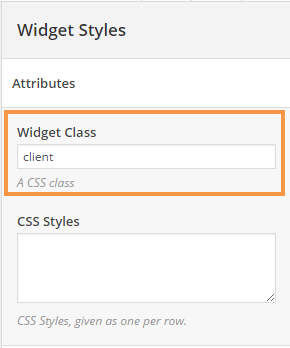
IMPORTANT NOTE: You must add class to all SiteOrigin Image widgets.
Front-end Appearance
Contact Section
Important Note: Before you start configuring the section, you must install Contact Form 7 plugin.
Phrase 1 Create a new contact form
Step 1 Once installed and activated the Contact Form 7 plugin, an item labeled Contact in the Dashboard sidebar, just click on Contact >> Add New

Step 3 Input a title for the contact form
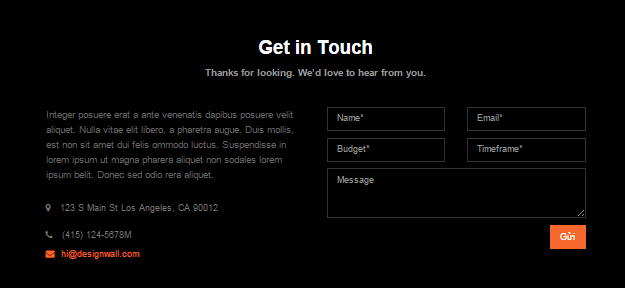
Step 4 Style your own contact form by using HTML. Below is our contact form in HTML, you can refer to if needed.
<div class="row">
<div class="col-sm-6"><p><input class="form-control" type="text" placeholder="Name*"></p></div>
<div class="col-sm-6"><p><input class="form-control" type="text" placeholder="Email*"></p></div>
</div>
<div class="row">
<div class="col-sm-6"><p><input class="form-control" type="text" placeholder="Budget*"></p></div>
<div class="col-sm-6"><p><input class="form-control" type="text" placeholder="Timeframe*"></p></div>
</div>
<p><textarea rows="3" class="form-control" placeholder="Message"></textarea></p>
<p><input type="submit" class="btn btn-primary pull-right"></p>
Step 5 Whenever you are done, just click on “Save” button
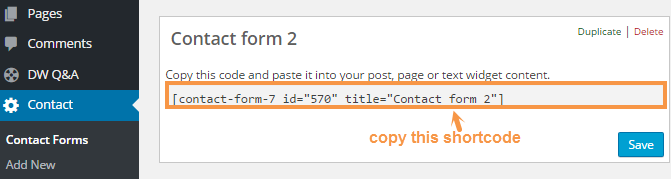
Step 6 After saving the contact form, a short-code will be shown, let’s copy it.
Phrase 2 Add the contact form to the homepage
Step 1 Go to Pages >> Home, click on the Page Builder tab
Step 2 Add a new row with 1 column
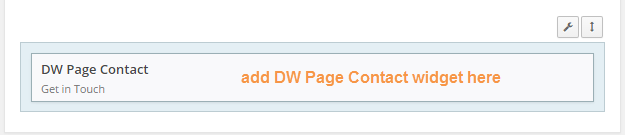
Step 4 Add DW Page Contact widget
Step 5 Input the title, descriptions, address for the DW Page Contact widget
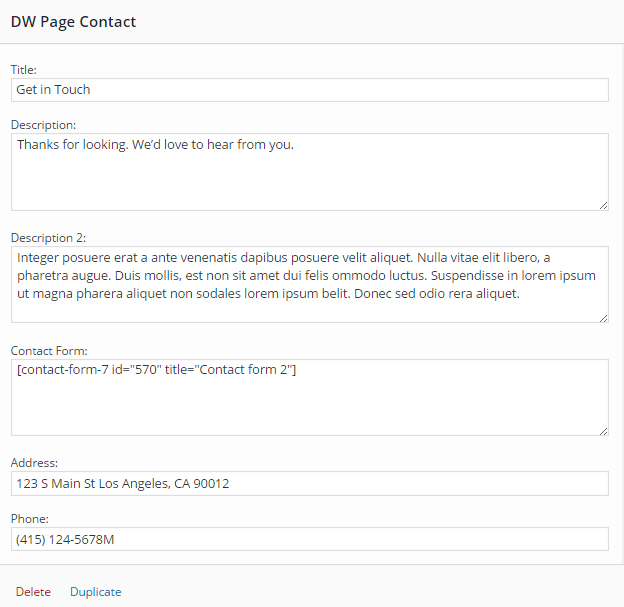
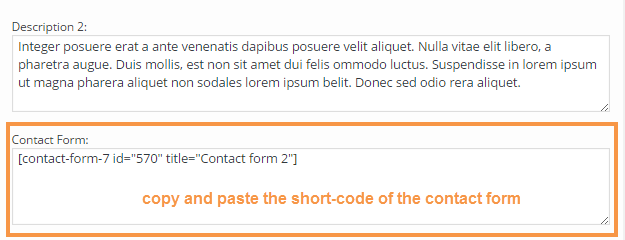
Step 6 Paste the shortcode of the contact form to the field “Contact Form”
Front-end Appearance