DW Argo: Pricing Table
This page lets you easily create a pricing table page with HTML code. Just two simple steps, you will have the pricing table as on our demo site. Now, let’s start!
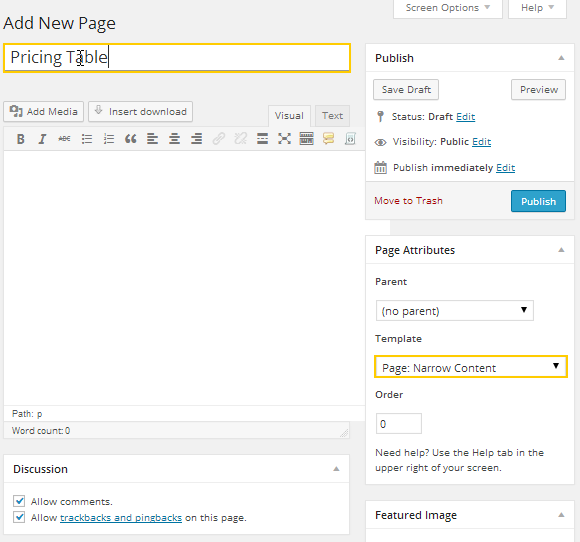
Step 1 Create a new page named Pricing Table
Just go to Dashboard >> Pages >> Add New. Here you enter your page title, select page attributes as you prefer. Please note that, you need to choose Page Template under Page Attributes pane as Page: Narrow Content.

Step 2 Write HTML code for the page
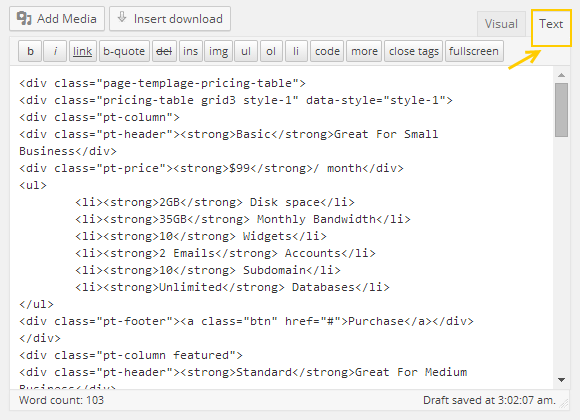
In case you have knowledge about the code, that’s great, you can make yourself a pricing table according to your taste. If you are unclear about anything, just copy/paste the following code:
<div class="page-templage-pricing-table"> <div class="pricing-table grid3 style-1" data-style="style-1"> <div class="pt-column"> <div class="pt-header"><strong>Basic</strong>Great For Small Business</div> <div class="pt-price"><strong>$99</strong>/ month</div> <ul> <li><strong>2GB</strong> Disk space</li> <li><strong>35GB</strong> Monthly Bandwidth</li> <li><strong>10</strong> Widgets</li> <li><strong>2 Emails</strong> Accounts</li> <li><strong>10</strong> Subdomain</li> <li><strong>Unlimited</strong> Databases</li> </ul> <div class="pt-footer"><a class="btn" href="#">Purchase</a></div> </div> <div class="pt-column featured"> <div class="pt-header"><strong>Standard</strong>Great For Medium Business</div> <div class="pt-price"><strong>$199</strong>/ month</div> <ul> <li><strong>50GB</strong> Disk space</li> <li><strong>350GB</strong> Monthly Bandwidth</li> <li><strong>10</strong> Widgets</li> <li><strong>10 Emails</strong> Accounts</li> <li><strong>Unlimited</strong> Subdomain</li> <li><strong>Unlimited</strong> Databases</li> </ul> <div class="pt-footer"><a class="btn btn-danger" href="#">Purchase</a></div> </div> <div class="pt-column"> <div class="pt-header"><strong>Professional</strong>Great For Large Business</div> <div class="pt-price"><strong>$299</strong>/ month</div> <ul> <li><strong>100GB</strong> Disk space</li> <li><strong>1000GB</strong> Monthly Bandwidth</li> <li><strong>10</strong> Widgets</li> <li><strong>Unlimited Emails</strong> Accounts</li> <li><strong>Unlimited</strong> Subdomain</li> <li><strong>Unlimited</strong> Databases</li> </ul> <div class="pt-footer"><a class="btn" href="#">Purchase</a></div> </div> </div> <div class="pricing-table grid4 style-2" data-style="style-2"> <div class="pt-column"> <div class="pt-header"><strong>Header</strong></div> <div class="pt-price"><strong>Features</strong></div> <ul> <li>Licensed Domains</li> <li>Licensed Themes</li> <li>Support & Update</li> <li>PSD Included</li> <li>Copyright Removal</li> </ul> <div class="pt-footer"><a class="button" href="#">Button</a></div> </div> <div class="pt-column"> <div class="pt-header"><strong>Free Theme</strong> Sub header</div> <div class="pt-price"><strong>Free!</strong></div> <ul> <li></li> <li>Free theme only</li> <li><i class="icon-remove"></i></li> <li><i class="icon-remove"></i></li> <li><i class="icon-remove"></i></li> </ul> <div class="pt-footer"><a class="btn btn-inverse" href="#">Sign Up</a></div> </div> <div class="pt-column"> <div class="pt-header"><strong>Single Purchase</strong>Sub header</div> <div class="pt-price"><strong>$49</strong>.99</div> <ul> <li>Unlimited</li> <li>Single theme</li> <li><i class="icon-ok"></i></li> <li><i class="icon-remove"></i></li> <li><i class="icon-remove"></i></li> </ul> <div class="pt-footer"><a class="btn btn-inverse" href="#">Sign Up</a></div> </div> <div class="pt-column featured"> <div class="pt-header"><strong>Bundle Purchase</strong>Sub header</div> <div class="pt-price"><strong>$149</strong>.99</div> <ul> <li></li> <li>All themes in bundle</li> <li><i class="icon-ok"></i></li> <li><i class="icon-ok"></i></li> <li><i class="icon-ok"></i></li> </ul> <div class="pt-footer"><a class="btn btn-danger" href="#">Sign Up</a></div> </div> </div> </div>
Paste it into the Text frame of the page editor area.

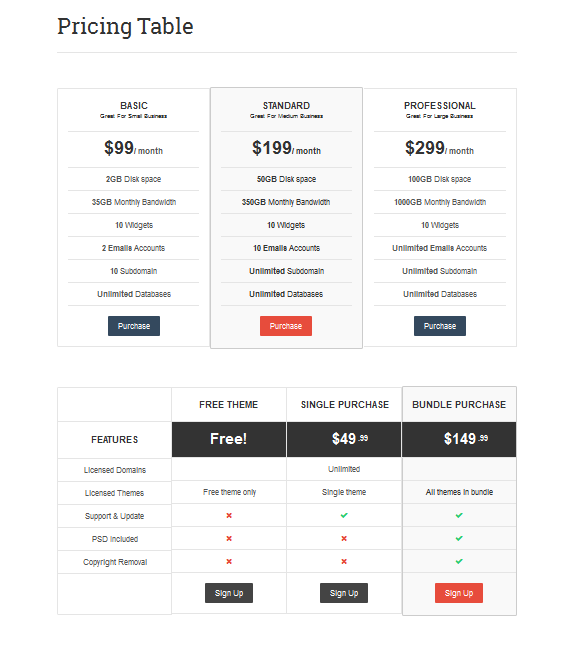
Make sure that you press “Publish” button to save all settings, reload the website and go to front-end to see the result:

